 English
 العربية
 中文(漢字)
 Čeština
 Dansk
Dansk Nederlands
 Suomi
Suomi Français
 Deutsch
 Italiano
 日本語
日本語 ಕನ್ನಡ
ಕನ್ನಡ 한국어
한국어 Português
 Русский
 Slovenčina
 Español
 Svenska
 Türkçe
CAXA ワイヤーカットは、ワイヤーカット工作機械の CNC プログラミング用ソフトウェア システムです。, 私の国のワイヤー切断加工の分野で幅広い用途があります。. 迅速に提供できる, 効率的, さまざまなワイヤ切断工作機械用の高品質 CNC プログラミング コード, CNC プログラマーの作業を大幅に簡素化します。. CAXA ワイヤ切断は、従来のプログラミング方法では完了することが困難なタスクを迅速かつ正確に完了できます。. It can provide you with automatic programming tools for wire-cutting machine tools, allowing the operator to interactively draw the graphics to be cut, and generate two-axis cutting traces with complex contours. CAXA wire cutting supports fast-moving wire cutting machine tools, and can output 3B, 4B and ISO format wire cutting processing programs. The process of automated programming is generally: Use the CAD function of CAXA wire cutting to draw processing graphics → Generate machining track and machining simulation → Generate wire cutting program → Transfer the WEDM program to the WEDM machine tool.
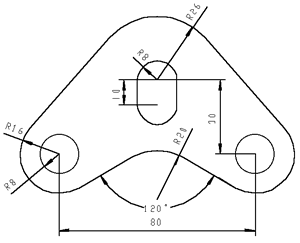
The following takes the processing of a convex-concave mold part as an example to illustrate its operation process. The dimensions of the convex and concave mold are shown in Figure 1. ワイヤーカット電極線はφ0.1mmのモリブデン線です。, 片面放電ギャップは0.01mmです。.
CNC加工自動プログラミング
形 1, 凹凸金型サイズの設計・加工
1> ワーク図面を描く
1.円を描く
(1) を選択 “基本的な曲線円” メニュー項目を選択し、 “中心半径” 円を作る方法;
(2) 入力 (0, 0) 円の中心位置を決める, 半径の値を入力します “8” 円を描く;
(3) コマンドを終了しないでください, 入力 “26” システムがまだプロンプトを表示する場合 “円弧上の点または半径を入力してください”, より大きな円を描く, マウスの右ボタンをクリックしてコマンドを終了します;
(4) 引き続き上記のコマンドを使用して円を作成します, 中心点を入力してください (-40, -30), 半径の値を入力してください 8 そして 16, それぞれ, 別の同心円のグループを描くには.
2. 直線を引く
(1) を選択 “基本の曲線・直線” メニュー項目, を選択 “2点線” 方法, システムは、 “最初のポイント (接点, 垂直の足のポイント)” 位置;
(2) スペースバーをクリックして、特徴点キャプチャメニューをアクティブにします。, そして選択します “接点” それから;
(3) R16 円の適切な位置をクリックします。, この時点でマウスを動かすと、カーソルが想像上の線を描くことがわかります。. 現時点では, システムは入力を求めるプロンプトを表示します “2番目の点 (接点, 垂直の足のポイント)”;
(4) スペースバーをもう一度クリックして、特徴点キャプチャメニューをアクティブにします。, そして選択します “接点” それから;
(5) 次に、R26 円の適切な位置で接点を決定します。, 2 つの円の外側共通接線は簡単に取得できます。;
(6) 選択する “基本的な曲線・直線”, クリック “二点線” サイン, に切り替えます “角線” 方法;
(7) 2 番目のパラメータの後のドロップダウン マークをクリックします, そして選択します “X軸角度” ポップアップメニューで;
(8) の記号をクリックしてください “角度=45” 新しい角度の値を入力します “30”;
(9) 前に使用した方法を使用して、 “接点” R16 サークルの右下の適切な位置をクリックします。;
(10) 仮想線を適切な位置にドラッグした後、, マウスの左ボタンをクリックして線画を完成させます.
3. 対称的なグラフィックを作成する
(1) を選択 “基本の曲線・直線” メニュー項目, 選択する “2点線”, に切り替えます “直交” モード;
(2) 入力 (0, 0), マウスをドラッグして垂直線を描きます;
(3) を選択 “カーブ編集-ミラー” ドロップダウン メニューのメニュー項目, そしてデフォルトを使用します “軸を選択” そして “コピー” メソッド. 現時点では, システムは要素を選択するように求めるプロンプトを表示します, 生成された 2 本の直線と半径の同心円をそれぞれクリックします。 8 そして 16 グラフの左下にある. マウスの右ボタンをクリックして確認します;
(4) 現時点では, システムは軸を再度選択するように要求します, 引いたばかりの鉛の垂直線を拾う, そして確認した後, 対称な図形が得られます.
4. 長い丸い穴
(1) を選択 “Curve Edit-Translation” メニュー項目, and select the “given offset”, “コピー” そして “orthogonal” メソッド;
(2) The system prompts to pick up the element, click the circle of R8, and click the right mouse button to confirm;
(3) The system prompts “X and Y direction offset or position point”, input (0, -10), it means that the X-axis displacement is 0 and the Y-axis displacement is -10;
(4) Use the above-mentioned method of making common tangents to generate the two vertical lines in the figure.
5. Final edit
(1) Select the rubber head icon, the system prompts “Pick up geometric elements”;
(2) Tap the plumb line and delete this line;
(3) を選択 “Curve Edit-Transition” メニュー項目, を選択 “Round Corner” そして “Cut” メソッド, and enter the “Radius” value of 20;
(4) Follow the prompts to take two diagonal lines with an angle of 30° with the X axis to obtain the required arc transition;
(5) を選択 “Curve Edit-Crop” メニュー項目, を選択 “Quick Crop” 方法, the system prompts “Pick the curve to be cropped”, 切り取る部分に注意してください;
(6) マウスの左ボタンを使用して存在しない線分をクリックして削除し、グラフを完成させます。.
2>軌道生成と加工シミュレーション
1. 軌道生成
軌道の生成は、構築された輪郭に基づいて行われます。, ワイヤーカット加工技術との融合, 決められた加工方法と加工条件を踏まえて, コンピューターが自動的に加工軌跡を計算します。. 以下、この例でワイヤーカットのワイヤーカット軌跡生成方法を紹介します。.
(1) を選択 “トラックの生成” アイテム, ポップアップダイアログボックスで, デフォルト値に従って処理パラメータを決定します.
(2) この例では, 処理トラックと図形の輪郭の間にオフセットがあります. When processing the concave die hole, the wire processing track is offset to the original pattern track for “gap compensation”. When processing the convex mold, the wire electrode processing track is offset outside the original pattern track for “gap compensation”. The compensation distance is ΔR=d/2+Z=0.06mm, 図に示すように 2. Enter this value into “first processing amount”, and then press OK.
形 2. Actual processing track
(3) The system prompts “Pick Contour”. This example is a concave-convex mold. Not only the outer surface but also the inner surface must be cut. Here, the concave mold hole is cut first. この例では, there are three concave mold-shaped holes. Take the circular hole on the left as an example, and pick the contour. 現時点では, the R8mm contour line turns into a red dashed line, マウスでクリックした位置の等高線に沿って、一対の緑色の双方向矢印が表示されます。, そしてシステムのプロンプトが表示されます “チェーンのピッキング方向を選択してください” (システムのデフォルトはチェーンピッキングです).
(4) 時計回りを選択後, 一対の緑色の矢印が垂直等高線の方向に表示されます。, システムはプロンプトを表示します “カットする面を選択してください”.
(5) 選択した輪郭は凹型の金型穴であるため、, 輪郭の内側を指す矢印を選択します, そしてシステムのプロンプトが表示されます “糸通し点位置の入力”.
(6) スペースバーを押して、特徴点キャプチャメニューをアクティブにします。, その中から「円の中心」を選択します, 次に、R8mm の円を選択します。. あれは, 円の中心が糸通し点の位置と判断されます, そしてシステムのプロンプトが表示されます “出口ポイントに入る (“入力” ネジ切りポイントと一致します)”.
(7) Click the right mouse button or press Enter, the system calculates the processing track of the concave model hole contour.
(8) 現時点では, the system prompts to continue to “pick contour”, and complete the processing tracks of the other two concave molds according to the above method.
(9) The system prompts to continue “pick contour”.
(10) Pick up section AB, at this time section AB becomes a red dashed line.
(11) The system prompts “チェーンのピッキング方向を選択してください”, “select cutting side”, “糸通し点位置の入力” そして “input exit point” in sequence. Select the order processing of A—B—C—D—E—F—G—H—A, and point B is the starting point of the sequence. This contour is the outer surface. Select the outer side of the processing, adjust the threading point to outside the mold base, take the point as P (-29.500, -48.178), and select this point as the exit point.
(12) a single right-end track or ESC to generate, edit track selection command “track jump” feature to connect the tracks in the preceding paragraphs.