1Cr18Ni9Ti ruostumattoman teräksen lujuus ja kovuus on erittäin alhainen (kovuus ≤187HB), ja plastisuus on erittäin korkea, with good acid resistance and corrosion resistance. Mechanical properties after solution treatment:
Yield strength s0.2≥205MPa, tensile strength sb≥520MPa, elongation d5≥40%, shrinkage rate y≥50%. It is very difficult to process with conventional grades of cemented carbide tools and conventional methods, because the material has high plasticity and toughness, which is prone to sticking and chip breaking is difficult. Samaan aikaan, vibration is generated, which makes the tool easy to chip and wear.

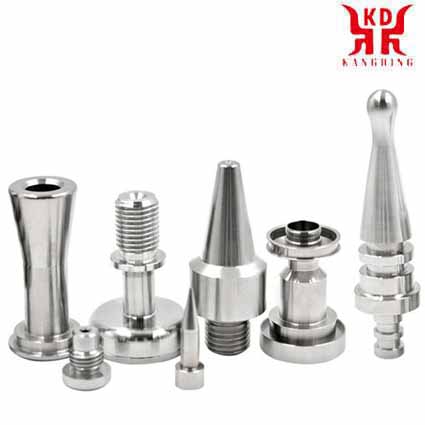
kromi-nikkeli ruostumattomasta teräksestä valmistetut osat
1. Tool material selection for CNC machining of stainless steel
According to the performance and characteristics of 1Cr18Ni9Ti stainless steel, the tool is made of cemented carbide blades, the brand is YG813. YG813 cemented carbide is equivalent to K10-K20/M20 of the international standard ISO, with a density of 14.4g/cm3, a hardness of 91.5HRA, and a bending strength of 2100MPa. The cemented carbide has good wear resistance, hot hardness, high temperature toughness and adhesion resistance, and is suitable for processing high temperature alloys, ruostumaton teräs, high manganese steel and other materials. Because YG813 is a WC-Co alloy with a small amount of rare refractory metal carbides, it has a fine structure and high strength, which is suitable for rough and fine processing.
2. Parameters such as cutting amount and tool angle for machining stainless steel
Take the flange (Kuva 1) currently produced by our company as an example to introduce the selection of parameters such as cutting parameters and tool angles.

Machining of stainless steel flanges
Kuva 1. Machining of stainless steel flanges
(1) Cutting amount during finishing of stainless steel
Among the three elements of cutting parameters, the increase in cutting depth ap and feed rate f will increase the cutting force, increase the deformation of the workpiece, and may cause vibration. Thereby reducing the processing accuracy and increasing the surface roughness Ra value. When the cutting speed v increases, the cutting force is reduced, and the built-up edge can be reduced or avoided, which is beneficial to the improvement of processing quality and surface quality. But in turning, when the cutting speed v=30-70m/min, it is easy to produce vibration. Above or below this range, the vibration tends to weaken: when the feed f is small, the amplitude is large. As f increases, the amplitude becomes smaller: the depth of cut ap increases, and the amplitude also increases. According to the above conclusions, when finishing the flange of Fig. 1, the cutting depth ap should be reduced as much as possible, and the feed amount f should be reduced appropriately.
Practice shows that the cutting speed v=15-25m/min, the cutting depth ap=0.10-0.15mm, and the feed amount f=0.18-0.25mm/r. In the final fine turning, the cutting speed v=80-100m/min, the cutting depth ap=0.01-0.03mm, and the feed rate f=0.11-0.16mm/r, which can achieve satisfactory results.
(2) Tool angle for machining stainless steel
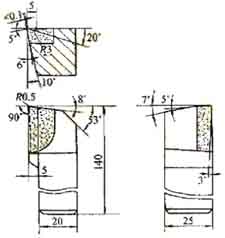
Properly increase the rake angle of the tool and reduce the feed rate to increase the cutting speed to obtain banded chips. The cutting force of the band-shaped chips is relatively stable, and the machined surface is smoother. Due to the low hardness of the workpiece material, the requirement for the firmness of the cutting edge is low, and the clearance angle of the tool can be appropriately increased to reduce the friction between the flank face and the machining surface of the workpiece to make the cutting edge sharp. The selection of the tool angle is shown in Figure

Technical parameters of machined stainless steel workpieces
Kuva 2. Schematic diagram of tool angle
(3) Cutting fluid for machining stainless steel
The role of cutting fluid is mainly cooling and lubrication to improve the cutting process. When finishing the workpiece, the main hope is to improve the surface quality and reduce tool wear. Siksi, the cutting oil with low specific heat and poor fluidity is selected. Its main function is to lubricate, and it also has a certain cooling effect.
(4) Clamping of stainless steel workpiece
According to the conventional three-jaw chuck to clamp the flange workpiece for cutting, it is difficult to achieve machining accuracy, especially the flatness and parallelism of the workpiece. Siksi, it is necessary to design a set of disposable fixtures. Ensimmäinen, the stainless steel flange blank is turned, the inner hole is temporarily drilled with a Ø18mm hole, and the end face and the outer circle are each left 0.5mm. Kun lopetat kääntämisen, first install, turn the outer circle of the end face, and then install and turn the inner hole, which can basically meet the technical requirements of the drawing.
 English
 العربية
 中文(漢字)
 Čeština
 Dansk
Dansk Nederlands
 Suomi
Suomi Français
 Deutsch
 Italiano
 日本語
日本語 ಕನ್ನಡ
ಕನ್ನಡ 한국어
한국어 Português
 Русский
 Slovenčina
 Español
 Svenska
 Türkçe

